Relinquishing too much creative control to non-designers can feel unsettling for you and them. You’re worried about design consistency, while they struggle to navigate potentially challenging design workflows. That is unless you have the right solution in place. Design Huddle’s Template Locking sets new standards in design integrity and user-friendly editing experiences.
Our locking feature enables admins to maintain greater oversight of the entire design process while providing non-designers with a simple approach to editing templates. Our customers consistently rely on template locking to define which elements and specific properties within templates can and cannot be edited by their team or users. These guardrails guarantee that customers’ designs remain consistent and that users have the creative freedom and simple workflows to easily produce quick designs for digital, print, video, and slides.
Let’s dive into everything you need to know about template locking, including how it works and what distinguishes Design Huddle’s locking features from the rest.
Template locking is an important step when extending the creative process to non-professionals. Whether you’re overseeing your company’s creative assets, distributing branded materials to clients, or allowing users to personalize designs through an embedded editor, maintaining control and simplifying the editing experience is key.
Outdated online design tools rely on developers to manage template locking at the SDK level, which makes it extremely difficult for admins to differentiate settings between templates. With Design Huddle, any admin user, regardless of their skill level, can easily configure locking and preview the user editing experience. Our flexible platform empowers customers to create a custom locking strategy that fits the unique needs of their business.
The most successful shared design environments have two crucial things in common: a consistent editing experience across templates and guidelines that clearly outline what the end user can modify. Both of these can be achieved by starting with a template locking schema.
Begin by pinpointing the specific design elements you want to protect, and determine which elements your users need to edit. For non-designers, the goal is to keep templates straightforward and ensure a consistent, user-friendly editing experience across your designs.
Consider these three important questions when developing your template locking schema to achieve design consistency and deliver intuitive workflows.
👉 Which individual design elements (e.g., text, media, etc.) should always be locked across all templates to prevent users from editing or moving them?
👉 How can placeholders be used to easily highlight specific areas within a template that users can edit, including images and text?
👉 What’s the best way to structure media libraries so that your users can access the right media for that particular design?
Once you’ve structured your template locking schema, creating new design templates for your users is fast and easy.
The next step is to apply the template locking schema as your global default locking configuration. This ensures that new templates automatically inherit the schema, creating a consistent baseline for locking across all templates.
For greater customization, Design Huddle offers the flexibility to quickly adjust or override locking settings on an individual template and element basis.
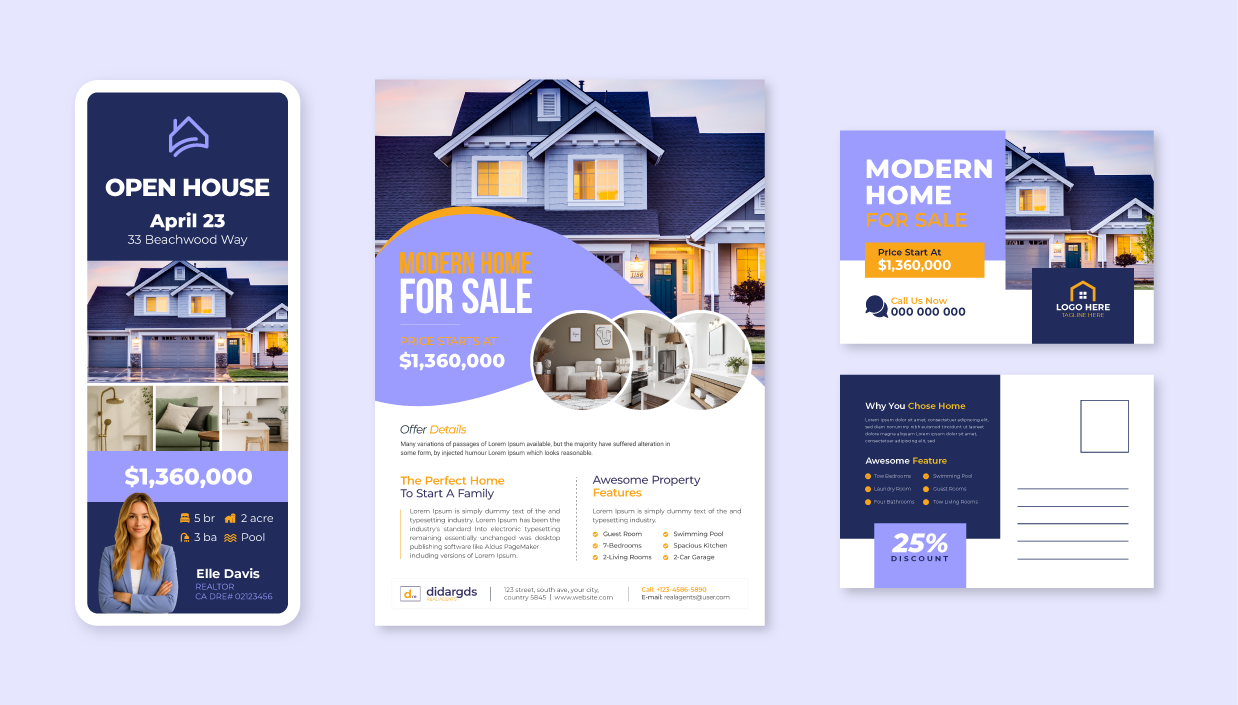
Maintain design consistency by locking the ability to add or edit any of the four main element types, as well as the specific properties of each element. Common examples include:
👉 Text - Content, font, color, text size, drop shadow, and curve text.
👉 Media - Filters, resize, rotate, crop, alignment, and position.
👉 Shapes - Color, proportions, position, and transparency.
👉 Backgrounds - Color, replace image, filters, and overlays.
Example: On text, enable the ability to change the font or offer specific colors or color palettes from which the user can select. On images, lock the option to add a color overlay.
Simplify media selections by only giving users access to approved media libraries. Plus, easily create media libraries and assign them to particular templates, or more specifically, to zones or placeholders within a template.
Example: During seasonal campaigns, create media libraries that contain holiday images and videos and assign the approved libraries to the seasonal templates. This ensures users only have access to add holiday imagery to the seasonal templates.
Customize locking configurations to your unique requirements with these four settings:
👉 “Locking Defaults”
Create a consistent locking schema for all new templates to inherit. When new template defaults are created, simply apply the setting to existing templates.
Example: A brand can enable default locking for their brand font and colors across all templates.
👉 “Apply as Default”
Eliminate repetitive steps by standardizing locking configurations across text boxes, shapes, images, and videos within new elements added and/or current elements on the design.
Example: In a template with 10 text boxes, apply locking configurations to a single text box and then use the “Apply as Text Default" to assign the locked settings to all 10 text boxes.
👉 “Lock all Attributes”
Gain design control by locking all granular attributes within a design element that you don’t want edited.
Example: On a video template where you only want users to have access to replace the video, select “Lock All Attributes.” This prevents modifications to the trim, background color, scale, and additional properties. Then, unlock the option to “Replace Video.”
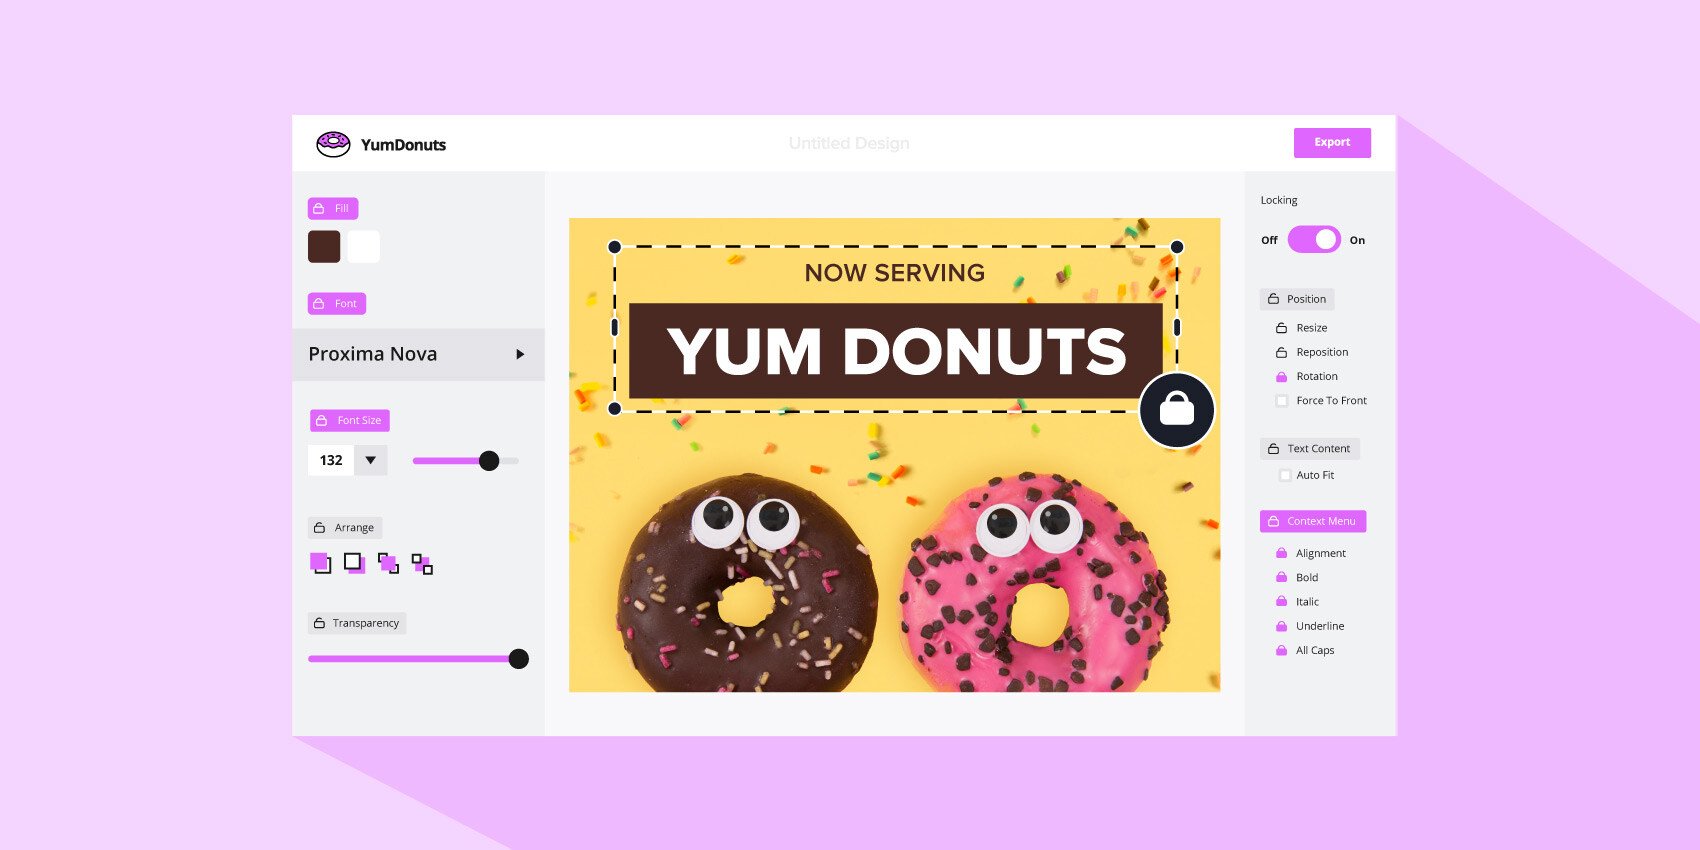
👉 “User Preview Mode”
Ensure accuracy and simple user workflows by leveraging this mode to visually see how the user's editing experience will appear with the locking settings applied.
Leverage additional features found within Design Huddle’s locking:
👉 AutoFit text boxes
Guarantee proper design execution by automatically reducing the text size to fit the required height, width, and line specifications in a text box.
Example: Social media ads often have space limitations. There may only be space for a small image and a single headline. If a user inputs five words instead of four, the AutoFit feature automatically reduces the text size to fit the headline space.
👉 Force elements to the front
Ensure that a required element is never covered by the end-user by keeping the selected element in the foreground of the design, even when other elements are added.
Example: On a slide presentation template with the company logo in the bottom right corner, apply the ‘Force to Front’ setting to prevent the logo from being hidden by other design elements.
We’re expanding our template locking with exciting new features that enable admins to quickly and effortlessly create different locking configurations. The additions to locking further strengthen our commitment to enhancing design integrity and simplifying the user editing experience.
To discover all that Design Huddle has to offer, schedule a time to chat. Are you already a customer and have questions on template locking? Check out our Knowledge Base.
Additional content to explore:
October 4, 2024